
JIM BLURTON
As low as
£219.60
In stock
Only %1 left
UNIT:
PRICES FROM
Product Description
Jim Blurton nippers provide quality, style and elegance for farriery professionals. The blades are made from H13 shock resistant tool steel, minimising the chances of chipping which is a common problem with many nippers on the market. Every pair has been set up and finished by hand to the highest possible standard.
Available as part of the Jim Blurton Professional Farrier Tool range, the nippers are available in 3 sizes and were developed and tested at Jim’s forge in Mid Wales. They have been tested by some of the world’s leading farriers and equine experts, and are available worldwide.
NWT Choose Yor Size
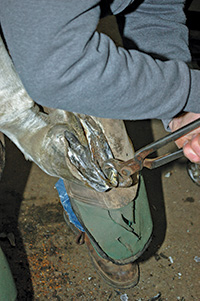
“Nippers need to fit you,” Gregory said. “Size and leverage are the two key elements that affect nipper design. Nippers need to be a size that’s appropriate for you and your hands, to the size of the feet that you are working on and the amount of leverage that you need.”
Nipper length winds up being a matter of leverage vs. control.
“If your nippers were 24 inches long, you’d have a lot of leverage,” says Gregory. “But you would have a hard time controlling them. By the same token, if your nippers were just 6 inches long, it would be very easy to put them right where you wanted to, but you wouldn’t have enough leverage to do the job.”

While the length is the most obvious difference between different types of hoof nippers, there are also variations in blade width, length from the rivet to the blades, rein flexibility and overall sturdiness.
Gregory says he uses different nippers at different times.
“I like 14-inch nippers, but I work on mostly average size horses like saddle horses or trail riding horses,” he says. “When I work on bigger horses or draft horses, I appreciate the 15-inch nippers. I also have a pair of 12-inch nippers that I use quite a bit.”
There’s more variance in nippers than just the length of the reins. Gregory has found that some brands are “springier” and easier to use than others, while other brands may be stronger and have more structural integrity, which can be a good thing if you are working on hard, dry feet, or horses with thick hoof walls.
“Climate is something you need to think about,” Gregory says. “A hot, dry climate means hard, dry hooves, so you’ll want a sturdy pair of nippers.”
Leverage is also affected by the placement of the rivet. The closer the rivet is to the ends of the blades, the more leverage you will get. But with that, you will also have a shorter distance from the inside of the tool to the end of the blades, and you won’t be able to take much of a “bite” out of the hoof wall.
On The Edge
He also suggests looking at the sharpness of the edge of the blades.
“You’ll find quite a bit of variance there,” he says. “If a blade is designed to be very thin, it will be very sharp, but it may become dull after just a few horses. But if a blade is too thick, you’ll be displacing material in the hoof wall, rather than cutting it. There’s a fine line between being thin enough to do the job and thick enough to hold up to the work.”
The width of the blades is also a factor. With a wider, you can do more with each squeeze, but that may not be as big an advantage as you think. Gregory says his own technique is to advance his trim by only a small increment of the blade width with each nip.
If you are doing a lot of different sized horses, you may find that you need to invest in more than one pair of nippers.
“A wider blade design may be preferable on a bigger horse such as a draft, but will be difficult to use on a pony or smaller footed horse,” Gregory says. “If I have a really wide blade and have to cut through a short radius, it becomes difficult. But if the blade is too narrow, I’m not doing enough work with each squeeze.”
Gregory says he’s learned from experience not to file down the stops, something he knows many farriers will do.
“If you grind down the stops, every time you squeeze the reins, you’ll have blade hitting blade,” he says. “You’ll ruin the sharpness. Dan Bradley (of G.E. Forge And Tool) told me this. When you hold your nippers up to the sun with the jaws closed, you want to see a little gap there. That means the blades aren’t hitting.”
Developing Technique
Gregory also says it’s important to develop a technique for nipping that works for you. He prefers to nip from one heel to the other, but says he knows many others who prefer to start at the toe and nip back to the heels.
While the length is the most obvious difference between different types of hoof nippers, there are also variations in blade width, length from the rivet to the blades, rein flexibility and overall sturdiness.
He also maintains that you should do your knife work before you reach for your nippers.
“Knife work is essential,” he says. “Do it first. You need to establish where you want the plane of the foot to be.”
Gregory begins by defining the frog. He gets rid of dead sole and told Summit attendees he has a problem with the commonly used phrase, “trimming to live sole.”
“Live sole has nerve endings and blood supply,” he maintains. “If you’re trimming to live sole, your quicking every horse.”
When using nippers, he places the nippers perpendicular to the bottom of the foot. He wants his trimming to follow the plane of the foot he wants at the end of the task.
“If you allow your nippers to lay out from there, you are going to have bevel where the inside of the nip is higher than the outside. That can be a really bad situation,” he says. “If anything you want to go the other way. Pull them back inside of perpendicular, so that you don’t have the inside higher than the outside. You create sole pressure by doing that.”
Gregory says it’s important to develop a technique that allows you to trim a foot flat. Beginners, he finds often have a problem with “diving” in at the quarters, resulting in a dish in the hoof wall.
He says one way to avoid this is to take a nip, then open the blade just enough to take the next bite, then give the reins a little twist toward the next nip. The inside blade will stay in line with the sole and the twist will “walk” the nippers to where the next bite needs to be.
“I only want to move about half the length of the blades on every nip,” he says. “When you’re learning, move even less and learn how to do this well. You can work on improving speed later.”
Gregory notes that some farriers will use nippers to trim bars, frogs and sole, but also cautions that, “If you quick a horse with a pair of nippers, you really quick him.”
Once he finished trimming with his nippers, Gregory knifes out the little ridge of sole that results from nipping.
“One of my rules is that you do not rasp sole,” he says. “A rasp can remove too much sole. You can’t really feel it sometimes.”
Specialized Nippers
There are nippers designed with a special purpose. These include heavy-duty nippers for using on draft horses, one-handed nippers for trimming foals and half-round nippers.
Half-round nippers, Gregory points out, are designed to “bite” differently than standard nippers.
“They aren’t designed to make a nice straight cut across a foot,” he says. “They’re designed to dig into a foot or hoof wall. They are more for resections or cases where you have to remove a lot of foot. They allow you to get into a foot where you can’t easily get in with a pair of flat jaws.”